Putting You in the Frame
6TH MARCH 2020 - ASU #224
By Nancy Williams
We recently had a query about frames. Most embroiderers work in a frame saying they achieve better tension and evenness with their stitches, but there is still some confusion about what frame is what.
What is the difference between a scroll frame and a slate frame? How about a hoop? Is it as good? And why on earth is a slate frame called a slate frame when it isn’t made of slate?
Let’s start at the beginning with the question, why use a frame at all?
For many stitchers, a frame is an essential part of their kit. Putting your work in or on a frame keeps your fabric taut which allows you to retain even tension across your stitching. That said, there are many exquisite embroiderers who only ever work ‘in hand’ or without a frame, so the issue is by no means black and white. Next, let’s explore the different type of frames available.

Embroidery Hoops
The most common types of frame are embroidery hoops. Available everywhere in a range of materials, sizes and shapes, the standard embroidery hoop has two rings, the outer with a join and a screw. You place your fabric over the inner ring, loosen the outer ring so you can place it over the top, then tighten the screw to hold your fabric taut. Depending on your hoop, you may need a screwdriver to tighten and loosen it, and you may need to periodically pull your fabric and re-tighten the hoop to keep it nice and firm.
Hoops are ideal for all kinds of embroidery, however if you are concerned about ‘squashing’ your stitches when you move the hoop to another part of the embroidery, you need to make sure you have one large enough to contain your entire piece. Next up is the scroll frame.

Scroll (Roller) Frames
A scroll frame is usually rectangular or square and consists of four bars – the two side bars which are often (but not always) shorter and the top and bottom roller bars which fit into the side bars. These can be turned so they roll up the fabric on either end, then they are secured with wingnuts to hold the bars tight.
 Mounting fabric on a scroll frame
To put your work in the frame, you first need to secure your fabric onto the top and bottom roller bars – usually by stitching it to the attached webbing. You then roll up the slack top and bottom so that the area you are going to stitch on is taut in the centre of the frame.
You can lace the sides, although because you’ll generally need to roll the fabric up or down to get to other parts of your embroidery, you may find yourself lacing and unlacing frequently.

Scroll frames are excellent if you are concerned about squashing your stitches. One of the problems, though, is unlike the hoop, you can’t remove your piece from the frame during the time you’re working on it. Once it is stitched on to the frame, it will have to remain there for the duration (unless you want to cut it off each time!)
Now onto the mysterious slate frame.
Slate Frames
Many embroiderers will agree, a slate frame is one of the best kind of frames you can use.
The slate frame also consists of four pieces, however your side bars are usually at least as long as your top and bottom bars. Like the scroll frame, you attach your fabric to the top and bottom bars, also called the stretcher bars, by stitching it on to the webbing. However, the idea of the slate frame is that your entire stitched area will be visible so there will be no rolling up or down during the time you stitch.
 Slate frame
The stretcher bars slot into the side bars, which are flat with a series of holes drilled top and bottom. Once the fabric has been secured to the top and bottom bars, you push the bars as far out from each other as possible and secure them with split pins or dowels. You need to ensure the split pins are even on both sides and when you think it is tight enough, give it another push and see if you can achieve another hole!
Once the fabric is taut, you can then lace the sides. Because the fabric is now secured for the duration, you can increase the tension by tightening the lacing – when you do it, it feels a bit like you are playing the harp. The result should be that your fabric is drum tight. However, you don’t want it so tight that little ripples are created when you start to stitch, as these will never come out.
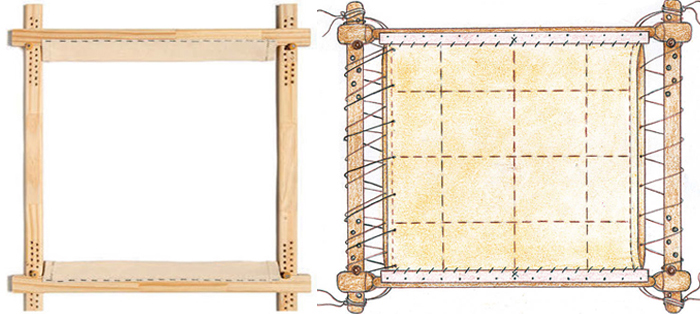 Mounting fabric on a slate frame
So why ‘slate’?
Well, the consensus seems to be that the term came from the children’s ‘slates’ which were provided in Victorian era schools to help them learn their letters.
The slate in these frames was brittle so easily broken. In an age unlike ours, where nothing was thrown away, the remaining frame was then used to secure a piece of fabric so a young girl could learn her stitches. It took a while, but by the mid-20th century the term had become synonymous with the frames we know today as slate frames.

Now to the most important question of all… which frame should you use and when?
While there are no absolute rules, here are a few guidelines you can follow:
If you need something light, small or you need to be able to remove your fabric from the frame between stitching sessions, choose a hoop.
If you’re happy for your work to remain on your frame, but don’t mind whether it is rolled, then a scroll frame is ideal. Although do note that they don’t work well for most kinds of raised work, goldwork or any type of embroidery with raised embellishments such as beading.
If you need perfect, all over tightness and you can’t flatten stitches or elements, then it is worth investing in a slate frame. They may seem large and cumbersome at times, but once you’ve used one, you’ll learn how to handle it and you’ll be pleasantly surprised at the results.

What kind of frame do you use? Have you had any good or bad experiences with frames? Or do you prefer to work without a frame? We’d love to hear from you, email us at news@inspirationsstudios.com